WebAgent User Guide
This user guide explains on how to use the WebAgent in standalone mode.
Overview

-
Dialogues
-
Contacts
-
Call History
Note: Only visible in combination with Universal Timeline Service -
Text Search
Note: Only visible in combination with Dialogue Manager -
Dial Pad
Note: Only visible when the Agent is configured for DCI. -
New Email
Note: Only visible in combination with Dialogue Manager and Email Dialogue Provider -
Open agenda
-
Open MePerson
-
Conversation controls
-
Conversation Tab
-
Timeline Tab
Note: Only visible in combination with Universal Timeline Service -
Cases Tab
Note: Only visible in combination with CRM Customer Relationship Management, or CRM, is (usually) a software-based, data management method to deal with interactions with customers and potential customers. Service -
Classifications Tab
Note: Only visible in combination with Call Property Service -
Contact information
Note: Only visible in combination with CRM Service -
Previous Contacts
-
Text input
Note: Only available for text conversations
Signing in to WebAgent
To use the WebAgent to handle communications, an Agent must sign in with valid credentials.
To sign in to WebAgent
-
Open a web browser page to the following URL:
Note: Based on your region, a different URL needs to be used. This information will be shared by your Anywhere365 representative.
Global:
https://webagent.anywhere365.io
NORA
https://nora-cus-webagent.anywhere365.io
https://nora-cus-2-webagent.anywhere365.io
https://nora-cus-3-webagent.anywhere365.io
EMEA
https://emea-weu-webagent.anywhere365.io
https://emea-weu-2-webagent.anywhere365.io
https://emea-weu-3-webagent.anywhere365.io
APAC
https://apac-eas-webagent.anywhere365.io
-
The WebAgent sign in page will appear:
-
Sign in using your Anywhere365-enabled account (Sign-in address + Password).
Note: If you are using an Office365 authentication method, make sure your browser is not set to block pop-ups. -
After logging in, you will be ready to start using the Anywhere365 WebAgent.

Login UCC
-
Click in the top right to open the MePerson (your account)

-
Select Manage Profile

-
Toggle the state to Sign In
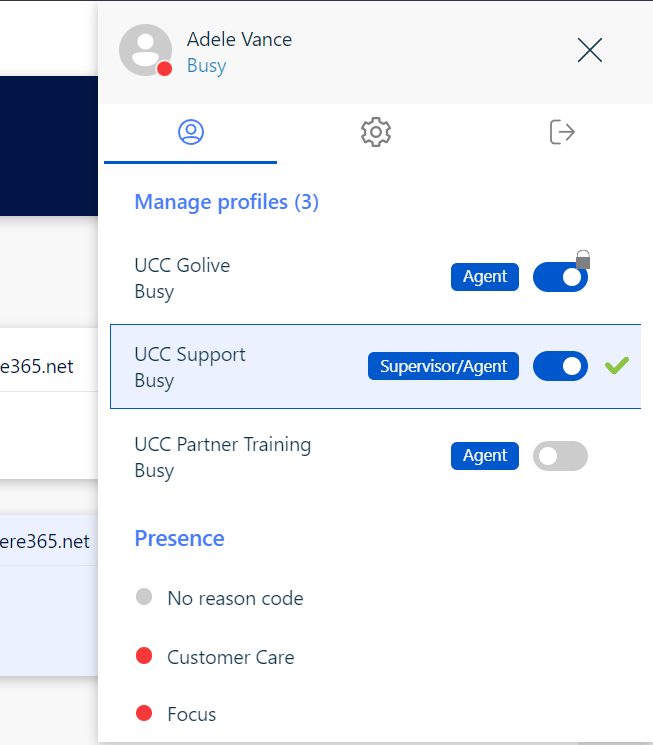
| Icon | Action | Description |
|---|---|---|

|
Sign Out | User is currently active, click to sign out. |

|
Sign In | User is currently inactive, click to sign in. |

|
Informal | User is Informal and doesn't have the option to sign in or out. |
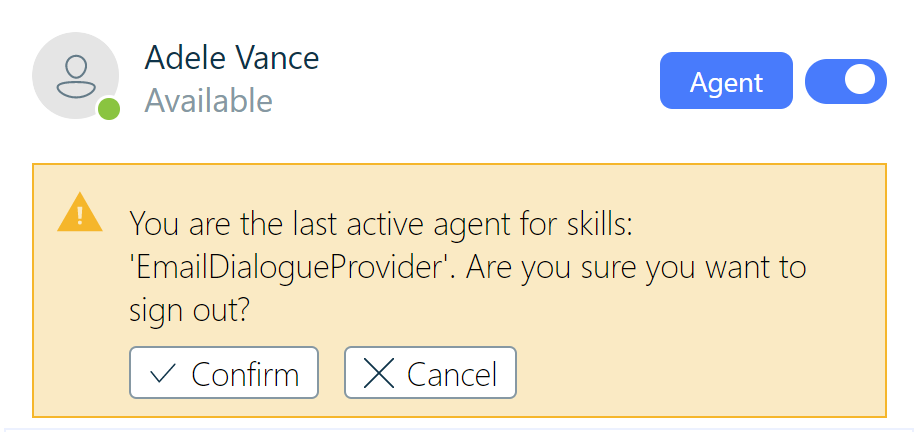
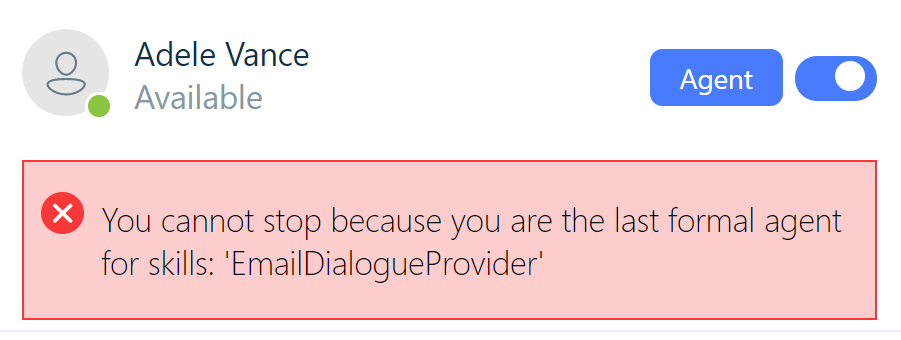
If you are the last agent in a skill, you may get a feedback based on the UCC setting "FeedbackAgentsLeftInSkill", Learn More
Confirmation
Warning

Error
Change Presence / Reason Code
Since Bundle DC2023.04 it is possible to also influence the Teams Presence according to the configured Reason Code state with the Graph-Presence-Publisher-Configuration
-
Click open your account in the top right

-
Select the presence / reason code you want to use

Incoming Calls
Incoming calls can be received directly or via the UCC (Unified Contact Center). When an incoming call is received, a pop-up will appear on your screen.
You have the option to pick up the call directly by clicking on the corresponding button, or to ignore the call by clicking on the "Ignore" button.

Please note that the appearance and functionality of the incoming call pop-up may vary depending on your organization's telephony system and settings.
Call Buttons
In the Call controls the following buttons are available. The following describes what functionality they have.
|
Icon |
Action |
Description |
|---|---|---|
|
|
Hold / Resume |
Click this button to put the call on hold. Click it again to resume the call. |
|
|
Disconnect |
Use the Disconnect button to end a current dialogue. |
|
|
Transfer |
With the Transfer button, you can transfer a call to another person or skill. For more information on how to use this feature, please refer to the "Transfer" section. |
|
|
Mute / Unmute |
Click this button to mute your microphone. Click it again to unmute. |
|
|
Add Participants |
Use this button to add more participants to the current conversation. |


These call buttons provide essential functionality for managing your interactions with customers and ensuring a positive customer experience.
Incoming call via the UCC example
Incoming calls can be handled directly or via the UCC (Unified Contact Center). For example, if someone calls the main number of your company and it is connected to a UCC, the call will be routed to an available agent with the relevant skill.
Let's say your company uses one skill and has two agents who are using the WebAgent. When the call comes in, it will be placed in a queue and the UCC will look for an available agent with the relevant skill. If you are available, the call will be forwarded to you and the WebAgent will ring, allowing you to answer the call.
If your colleague is initially hunted for the call but does not answer, the call will remain in the queue. You can either pick up the call from the queue or wait until the UCC decides to hunt for another agent (in this case, it would be you if you are available).
The UCC is a powerful tool for managing incoming calls and ensuring that they are handled efficiently and effectively.
Putting calls on hold
To put the current caller on hold, simply press the yellow "hold" button. When a call is placed on hold, the icon will change to indicate that the call is currently on hold.
While a caller is on hold, it's important to keep them informed and provide an estimate of how long they can expect to be on hold. This can help to reduce frustration and improve the overall customer experience.
When you're ready to resume the call, simply click the "resume" button to reconnect with the caller.
Remember, putting a caller on hold should be done with care and consideration. By keeping callers informed and minimizing hold times, you can help to ensure a positive experience for your customers and maintain the reputation of your company.
Audio Recording Control
Note: Both UseAudioRecording (on UCC settings) and AgentCanEditAudioRecording (on UCC settings) must be true. Learn More
Description
Agents with the WebAgent can control the audio recording with the Call recording controls

Behavior
Pause recording
During a recording
-
In the conversation header
-
Click in the "ll" icon
-
The recording is now paused
Resume recording
During a (paused) recording
-
In the conversation header
-
Click in the play icon
-
The recording is now resumed
Stop recording
During a recording
-
In the conversation header
-
Click in the stop icon
-
The recording is now stopped
Transferring Calls
Note: To use the Call Buttons, you need to configure the Remote Call Controls, Learn More
Note: Contacts are searched via Microsoft Graph in the Microsoft Entra ID Formerly known as Azure Active Directory (or Azure AD, or AAD), filtered on Organizational Users.
Direct Transfer
A direct transfer, also known as a blind transfer, involves transferring the conversation directly to another contact. If successful, the conversation will be transferred, and if unsuccessful, the conversation will remain with the agent. You can initiate a direct transfer using the following steps:
-
Have an active call with a customer.
-
Click on the transfer icon
 and search for the contact to whom you want to transfer the call.Note: Optionally, select the specific endpoint (e.g., mobile) for the contact.
-
The conversation will be offered to the contact:
-
If the contact accepts, the conversation is transferred to them.
-
If the contact refused, you will remain connected to the customer.
-
Delight transfer
A delight transfer is a process of consulting with the transferee while the customer is part of the consultation, ensuring that the right information is handed over. You can initiate a delight transfer either by drag and drop or via buttons.
Initiate via Drag and Drop
-
Have an active call
-
Search for a contact in the contact pane
-
Drag and drop the contact on the "Release to Delight Transfer box"
Note: Optionally, you can select the specific endpoint, such as mobile.
-
The conversation will now be offered to the contact:
-
If the contact accepts, you are now in a delight transfer

-
If the contact refuses, you remain connected with the customer
-
Initiate via Buttons
-
Have an active call
-
Click on the
icon and search for a contact to consultNote: Optionally, you can select the specific endpoint, such as mobile.
-
The conversation will now be offered to the contact:
-
If the contact accepts, you are now in a delight transfer
-
If the contact refuses, you remain connected with the customer
-
During a delight transfer
During a delight transfer, you have access to the following controls:
|
Icon |
Action |
Description |
|---|---|---|
|
|
Disconnect Consult |
Click this button to disconnect the consulted party. |
|
|
Mute / Unmute |
Click this button to mute or unmute your microphone. |
|
|
Add participant |
Click this button to add more participants to the current conversation. Note: By default up to 4 participants can be participating, this includes the Customer and the Agent. |
|
|
Transfer |
Click this button to hand over the consulted party and exit the conversation. |


Consultative transfer
A consultative transfer involves consulting with the transferee while the customer is on hold. Here's how you can initiate it:
Initiate via Drag and Drop
-
Have an active call
-
Search for a contact in the contact pane
-
Drag and drop the contact on the "Release to consult box"
Note: Optional: You can select the specific endpoint, for example, mobile.
The conversation will now be offered to the contact. If the contact accepts, you are now in a consultative transfer. If the contact refuses, you remain connected with the customer.
Initiate via Buttons
-
Have an active call
-
Click on the consult icon
and search for a contact to consultNote: Optional: You can select the specific endpoint, for example, mobile.
The conversation will now be offered to the contact. If the contact accepts, you are now in a consultative transfer. If the contact refuses, you remain connected with the customer.
During a consultative transfer
During the consultative transfer you have the following controls:
|
Icon |
Action |
Description |
|---|---|---|
|
|
Disconnect Consult |
With the Disconnect button, you can disconnect the consulted party. |
|
|
Mute / Unmute |
Click to mute your microphone. Click again to un-mute. |
|
|
Transfer |
Hand over the consulted party and leave. |
Skill transfer
Skill Transfer allows you to transfer a conversation to another Skill queue or forward it to a Forward Skill.
Initiate via Buttons
-
Have an active call
-
Click on the transfer icon
-
Click on the "Skill Transfer" tab

-
Search for the skill you want to transfer the conversation to
-
Select the skill
-
The conversation will be disconnected from you and transferred to the selected skill.
During a Skill Transfer
During the Skill Transfer, you will not be able to monitor the conversation. The conversation will be handled by the agents assigned to the selected Skill.
Outgoing Calls
Note: To perform an outbound call, Direct Call Integration (DCI) may need to be configured. For more information on how to configure DCI, please refer to Configure Direct Call Interceptor / Outbound Calling for WebAgent
Selecting outbound phone number
- DC2023.03 or higher
- DC2023.02 or lower
You can make an outbound call on behalf of any active UCC you are signed into, by selecting an endpoint with a phone number in the Dialpad menu. To access the Dialpad menu, click on the dialpad icon in the left side menu. You can switch numbers by selecting another endpoint in the Dialpad menu. If the number you want to select is greyed-out, it means you are not signed into that UCC. If you do not see the dialpad menu, it means your administrator has not enabled outbound calling.
An outbound call will be made on behalf of the main endpoint of the selected UCC. You can switch outbound endpoint by selecting another UCC in the MePerson menu, which can be accessed by clicking on your profile at the top right of the screen.
Contacts
Note: Contacts are searched via Microsoft Graph in the Microsoft Entra ID Formerly known as Azure Active Directory (or Azure AD, or AAD) and filtered on Organizational Users.
To initiate an outgoing call, you can start from any contact card:
-
Use the search, frequent contact or previous contacts function to look up a contact.

-
Click on the contact card to slide down a gray area. From here, you can make a call, call mobile, or send an email.
-
Additional options become available when you click the three dots on the right side of the bar. From here, you can view the full contact card, see the agenda, or add the contact to a group.

Dial pad
Note: Unfortunately, it's not possible to send DTMF tones using the dial pad. To send DTMF tones, please use the
Note: Contacts are searched via Microsoft Graph in the Microsoft Entra ID and filtered on Organizational Users.
Besides the possibility of calling someone using the contact cards, you are also able to call directly from the dial pad. To open the dial pad, simply press the dial pad button on the upper left side of the screen, dial the correct number and press the green call button.

Call History Tab
You can use this tab to view your incoming, outgoing, and missed calls.
To dial a contact directly from the Call History tab, simply open the conversation and click on the call icon.
Here's what each category in the Call History Tab represents:
-
All: This category displays all the items combined from the other three categories (Incoming, Outgoing, and Missed).
-
Incoming: This category displays all the direct conversations that were accepted by the agent, as well as all inbound contact center conversations that were accepted by the agent.
-
Outgoing: This category displays all the direct conversations initiated by the agent (interceptor or DCI).
-
Missed: This category displays all the direct conversations (interceptor) that were not accepted by the agent.

Outgoing Email
Selecting outbound email address
When sending an outbound email, the email will be sent from the first configured Email Dialogue Provider of the selected UCC. To switch mailboxes, select another UCC from the MePerson menu. You can access the MePerson menu by clicking on your profile picture in the top right corner of the screen.
Initiate an New Email Session
There are two options to start a new email session:
-
Select a contact and click on the Email icon in the grey area that slides from the top of the contact card. This will open a new email window.
-
Click on the New Email button on the upper left side of the screen to open a new email window.
In the new email window, enter the recipient's email address and the subject of the email. After entering the fields, you can initiate the session with the "Create new email" button.

A new Outbound Email session will now open in the WebAgent. From here, you can compose the body of the email and attach any necessary files. Once you're ready to send the email, click on the "Send" button.
It's important to note that the first email must always go to the primary recipient when creating the Outbound Email Session. After sending the first message, you can then start sending forwards to other recipients.
Wrap-up Time
Description
Agents with the WebAgent can manage their Wrap-up Time or Discharge Duration. This feature allows the agent to finalize their work and update relevant information in the system.
Requirements
The Discharge Duration (found in UCC settings) must be set to 1 or higher for this feature to be available.

Behavior
During Wrap-up Time, the agent can see a timer on their screen indicating the remaining time before they're allowed to accept another call. If the agent needs more time, they can extend the Wrap-up Time by clicking the "+" button. Each click adds 10 seconds to the remaining time.
If an agent needs to stop the Wrap-up Time before it expires, they can click the cancel button. This will immediately make them available to accept another call.
Contacts
On the left side of the WebAgent you will find the contacts. These contacts can be displayed in two ways.
Search
On the top side of the contacts, contact can be search using the search bar. The contact are searched in the Teams contact list, which is the same as in the client.
Contact card
From here you can send an IM, call, call mobile, send an email or choose more options. Choosing for more options is done via the three little dots, when pressing this button, another menu opens and you will be able to see the contact card, see the agenda of the contact or add to a group.
By clicking on the ‘See Contact Card’ button, the full contact card will be displayed within the contacts column. From there the WebAgent is able to contact the person via the channels they have submitted (e.g. work phone, private phone or alternative email addresses).

Frequent transfers
This group is automatically generated based on the data received from the Universal Timeline Service. The Universal Timeline Service generates a list of your top transferees based on the Call Detail Database. This list can be accessed from the Frequent Transfers group in the Anywhere365 WebAgent.
The Frequent Transfers group shows a list of the top agents to whom you have transferred calls in the past. This feature can be helpful in speeding up your call transfers by allowing you to quickly select a frequently transferred agent from the list, instead of manually searching for them.
To use this feature, simply click on the Frequent Transfers group in the Anywhere365 WebAgent to access the list of frequently transferred agents. From there, select the agent you want to the call to, and use the drag and drop functionality to initiate a Delight Consult of a Consult.
Groups
Groups in the WebAgent allow you to organize your contacts for easier access and management. Here's how you can create a group:
-
Search for a contact that you want to add to a group.
-
Open the contact's more options menu by clicking on the ellipsis icon.
-
Select "Add to new group" from the menu.
-
Give your new group a name.
-
Select the group you want to add the contact to, or create a new group if you haven't done so already.
-
Click "Save" to add the contact to the selected group.
You can also add existing contacts to a group by selecting "Add to group" from the contact's more options menu and choosing the group you want to add them to. To remove a contact from a group, select "Remove from group" from the contact's more options menu while viewing the group's members.

Dialogues
Overview
In the Dialogues tab of the overview you can see which dialogues are connected to the agent (Personal), in the waiting, or connected to other agents. You will see the name, number or email address and time in the queue.
Naturally you can select which call you want to take from the queue.
|
Icon |
Action |
Description |
|---|---|---|
|
|
Take |
Take the session from the waiting queue. The conversation will now be offered to the Agent. |
|
|
Preview |
(Text session only) Show the conversation as a preview. From here you can see the content of the conversation and you will have the option to "Take" the session. |


Dialogues Settings
For the Waiting and Connected tabs, you have the option to configure the view. This can be done with the following buttons: 
Here you have the following actions
-
Sorting Options = Sort the queue by on of the following attributes:
- (Connected only) Agent = Sort by alphabetic order of the assigned Agent uri.
- Duration(default) = Sort descending by duration.
- ReceivedDataTime = Sort ascending by datetime the conversation was received.
- Skill = Sort by alphabetic order of the assigned Skill name.
-
Grouping Options = Change the grouping of the queue to one of the following attributes:
- (Connected only) Agent = Group by Agent assigned to this conversation.
- Channel = Group by Channel, for example Email, WhatsApp, etc.
- Domain = Group by the domain of Receiver of the conversation.
- Receiver = Group by Receiver of the conversation.
- Skill = Group by current assigned Skill of the conversation.
- UCC = Group by UCC of the conversation.
-
View = Change the view of Text items:
- Compact = A compact view of the results, with the following attributes:
- Type = The type of the conversation.
- Sender = The URI of the sender.
- Skill= The Skill where the conversation is connect to.
- Duration = Show the duration of the conversation. Time between condensation created and now.
- Extended = Compact view extended with the following attributes:
- Subject = The subject (header) field of the conversation.
- Reference ID = Reference ID is an unique ID created per Text conversation.
- Received date and time = The datetime the conversation was received.
- Compact = A compact view of the results, with the following attributes:
Contact Information
The contact information section displays additional information about the selected contact. If the information is available in the back-office system, it will be displayed here. However, if the contact cannot be found, you can use the "Contact Search" function to locate the contact.
To use the "Contact Search" function, click on the relevant button and enter the contact details, such as their name or phone number. Once you have entered the required information, click on "Search" to initiate the search process. If the contact is found, click the "Select" button and their information will be displayed in the contact information section.

Previous Contacts
In addition to displaying the current contact's information, the contact information panel also displays the previous contacts made by the customer. This information is obtained from the Timeline sessions and shows all contacts, sorted in alphabetical order.
The previous contacts list provides a quick and easy way to view the history of the customer's interactions with your organization.
Please note that the previous contacts list may not include all interactions, as it is dependent on the data collected and stored in the CDR database.

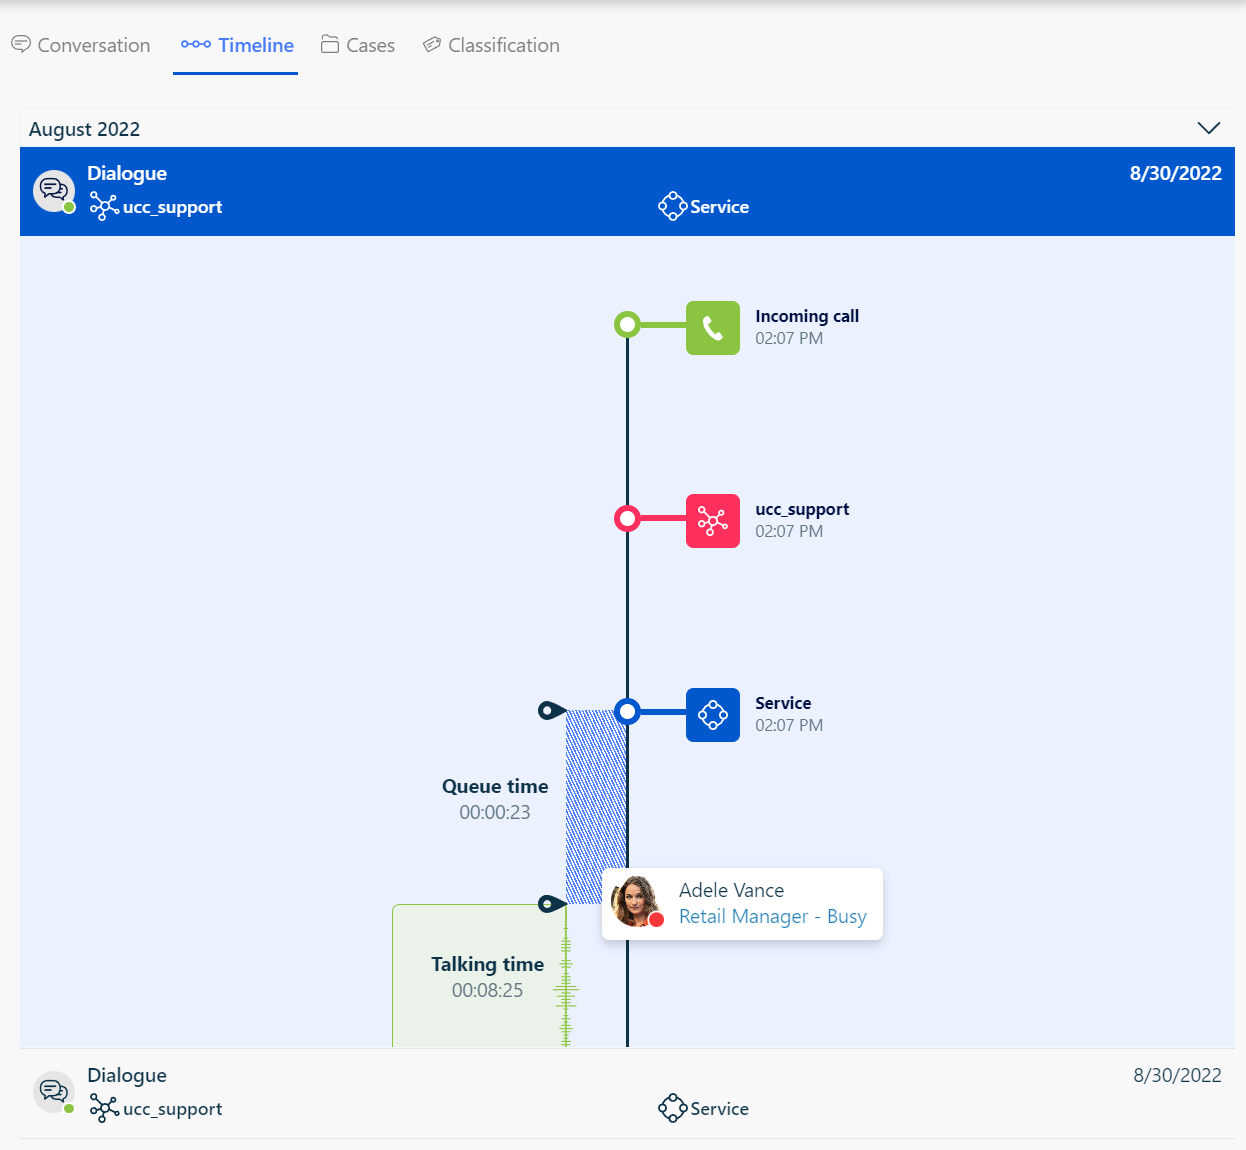
Timeline
The timeline feature allows you to view information about previous interactions with the customer. To access the timeline, click on the icon. This will load all the contact moments associated with the customer's information.
In the top bar of the timeline, you can scroll through the various dialogues and interactions. By clicking on a specific dialogue or interaction, you can view more details about that contact moment. These details include information about the skills used, the agent who handled the contact, and whether the dialogue was transferred or not.
The timeline feature provides a comprehensive overview of the customer's interactions with your organization. This information can be used to identify patterns, track customer behavior, and improve overall customer service.
Please note that the timeline feature only displays information about previous interactions with the customer, not the current one. If you require assistance with the current contact, please refer to the relevant sections of the platform or consult with your supervisor or team leader for guidance.
Cases
If there are any cases associated with the customer, you can view them by clicking on the Cases tab. This will load all the relevant CRM service cases for the selected contact.
If a URL is available for a particular case, you can click on it to open a new tab that will load your back-office application. This will allow you to view additional details and information about the case, such as notes, comments, and updates.

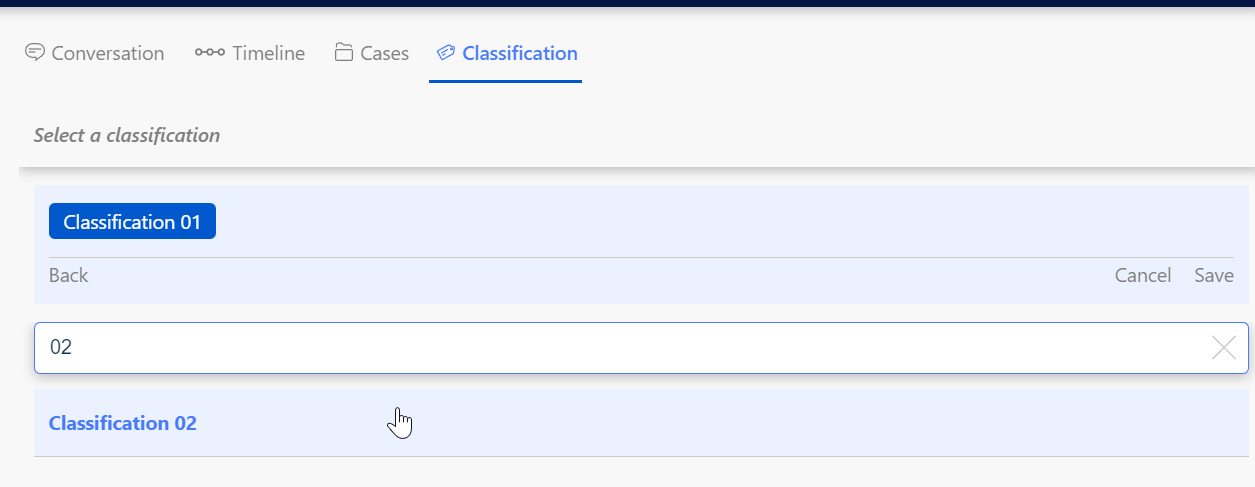
Classification
To access the Classification tab, click on the Classification tab during an active call, it will also be automatically opened as a pop-up when Finishing a conversation. Here, you can select a predefined classification from the drop-down menu. Once you've selected the appropriate classification, click on the "Submit" button to send the data to the database. This will allow you to generate Dialogue Intelligence reports based on the selected classification.
|
Action |
Audio Session |
WebChat Session |
Email Session |
WhatsApp Session |
|---|---|---|---|---|
|
Customer Disconnect |
Conversation goes in wrapup and the agent can classify. |
Conversation goes in wrapup and the agent can classify. |
N/A |
N/A |
|
Agent Disconnect |
Conversation goes in wrapup and the agent can classify. |
N/A |
N/A |
N/A |
|
Successful Blind Transfer |
Conversation is removed from the Agent. Note: If the transferee is also an Agent in the same UCC, then the conversation will be shown to the transferee and the transferee can classify after the disconnect. Warning: If the transferee is not an Agent in the same UCC, then no classification can be done during wrapup. |
N/A |
N/A |
N/A |
|
Delight Transfer Completed |
Conversation is removed from the Agent. Note: If the transferee is also an Agent in the same UCC, then the conversation will be shown to the transferee and the transferee can classify after the disconnect. Warning: If the transferee is not an Agent in the same UCC, then no classification can be done during wrapup. |
N/A |
N/A |
N/A |
|
Consultative Transfer Completed |
Conversation is removed from the Agent. Note: If the consultee is also an Agent in the same UCC, then the conversation will be shown to the consultee and the consultee can classify after the disconnect. Warning: If the consultee is not an Agent in the same UCC, then no classification can be done during wrapup. |
N/A |
N/A |
N/A |
|
Skill Transfer Completed |
Conversation is removed from the agent and enters the queue again. Warning: If the customer disconnects while waiting, then no classification can be done. |
Conversation is removed from the agent and enters the queue again. Warning: If the customer disconnects while waiting, then no classification can be done. |
Conversation is removed from the agent and enters the queue again. |
Conversation is removed from the agent and enters the queue again. Warning: If session expires while waiting, then no classification can be done. |
|
Agent press handle |
Conversation is removed from the agent and the agent can no longer classify. |
Conversation is removed from the agent and the agent can no longer classify. |
Conversation is removed from the agent and the agent can no longer classify. |
Conversation is removed from the agent and the agent can no longer classify. |
Agenda

The agenda can be opened with the  . After signing in you can see your current agenda of today.
|
Icon |
Action |
Description |
|---|---|---|
|
|
Day |
See the Agenda items in a per day view. |
|
|
Month |
See the Agenda items in a per month view. From here you can select the day you want to see. |
|
|
List |
See the Agenda items in list view. |
|
|
Previous |
Go to the previous day or month. |
|
|
Next |
Go to the next day or month. |
|
|
Today |
Return to today. |


Open contacts Agenda
-
Search for a contact in the contact panel.
-
Click on the contact and select the more options button.

-
This will open a menu, in here you can select "See Agenda".

-
This will open the agenda pane with the agenda information of the contact.
Call History
The Call History shows information about previous audio conversations of the Agent. You can open it by clicking on the  icon. Based on the historic information of the UCC (CDR Database) the previous audio conversations are shown.
-
All = All audio conversations where the Agent was the Initial Agent or the Initial Transferee.
-
Incoming = All incoming audio conversations where the Agent was the Initial Agent or Initial Transferee.
Note: This only includes conversation where the Agent accepted the conversations. Hunts are not included. -
Outgoing = All outbound audio conversations (Outbound intercepted, Initiated via the Dialpad, or Click to Dial) where the Agent was the Initial Agent.
-
Missed = All direct inbound audio conversations (Inbound intercepted) missed by the Agent.
Note: This does not include hunts of regular incoming UCC conversations.
Side bar

From top to bottom:
|
Icon |
Action |
Description |
|---|---|---|
|
|
Incoming |
Shows the calls that are currently in the Queue |
|
|
Contacts |
Providing search capabilities to find contacts and initiate chats / calls to them |
|
|
Call history |
Overview of historical calls with ability to call back contacts, or remove them from the list. Note: Only visible in combination with Universal Timeline Service
|
|
|
Search Text |
When connected to the Dialogue Manager, you can search preview text based conversations. Note: Only visible in combination with Dialogue Manager
|
|
|
Dialpad |
This opens the dial pad. From here you can enter a phone number to initiate an outbound call. Note: Only visible when the Agent is configured for DCI.
|
|
|
New Email |
This opens the new email menu. From here you can enter the information to initiate an new email session. Note: Only visible in combination with Dialogue Manager and Email Dialogue Provider
|


Settings
Accessing Settings:
To configure your WebAgent settings, click on the MePerson menu located on the top right corner of your screen. From there, select "Settings" to access the various options available.
General Settings:
Under the General settings, you can customize the following options:
-
Change theme: You can set the color theme of the WebAgent. Choose between Dark theme, Light theme, and Teams theme.
-
Notification time: You can select how long a notification should be displayed. Choose between 5 Seconds, 10 Seconds, 30 Seconds, or No Timer.
-
First open dialogue tab: You can configure which tab should be open by default for a new conversation. Choose between Cases, Classification, Contact information, Conversation, and Timeline. If the selected Tab isn't available, it will fallback to Conversation.
-
Enable shortcuts: You can toggle if shortcuts should be enabled. By default, they are enabled.
Audio Settings:
Under the Audio settings, you can customize the following options:
-
Incoming text conversation: When enabled, an audio file will play when a text conversation is offered to the Agent. Choose between None, Ringtone 1, and Ringtone 2. This way, an agent can hear a text session being offered even when the WebAgent isn't on the screen.
-
Incoming text message: When enabled, an audio file will play when a new text message is added to the text conversation. Choose between None, Alert 1, and Alert 2. This way, an agent can hear a new text message has been received even when the WebAgent isn't on the screen.
Uncaught (in promise) DOMException: play() failed because the user didn't interact with the document first.